Before you begin
Make sure you have everything on this list ready before you start. Gathering these up front will save you interrupting your flow halfway through.
The full App is around 350KB as it doesn't contain your data or images.
What does "web hosting access" mean?
You need somewhere on the internet to put the app files so visitors can reach them via a URL. Most commonly this is:
- cPanel hosting — the most common NZ hosting (e.g. SiteTech, FreeParking, OpenHost, CrazyDomains). You log in to a control panel and use "File Manager" to upload files.
- FTP access — if your host doesn't have cPanel, you can use a free FTP program like FileZilla or Cyberduck to upload files.
- Website builder platforms (Wix, Squarespace, Shopify) — these don't work with this app. The Guided Trail System needs traditional file-based hosting. If you're not sure, ask your hosting provider "can I upload HTML and JS files to a folder?"
You need HTTPS. Modern browsers block GPS location on non-HTTPS pages. Most NZ hosts include a free Let's Encrypt SSL certificate — check that it's active on your domain before starting. If your site loads as http:// instead of https://, the GPS features will not work. The App will work fine but not be able to use the User-positioning feature or auto-detect when a user is near a Pinned item on the map.
Unzip & understand the files
Find the ZIP file you downloaded from us (likely in your Downloads folder). It will be named something like guided-trail-4.4.0.zip.
Unzip it
- Windows: Right-click the ZIP → "Extract All..." → choose a folder.
- Mac: Double-click the ZIP file. A folder will appear next to it.
What's inside
Open the unzipped folder. You should see this file structure:
Which files will I edit? Only three: config.js (Step 4), save.php (Step 4 — to set your password), and the image/audio files you add to images/, tiles/, and audio/. Everything else is the app itself — leave it alone.
About .htaccess: This file may appear as htaccess.txt in your download (files starting with a dot are hidden by default on Windows and Mac). If you see htaccess.txt, upload it to your server as-is, then rename it to .htaccess (with the dot, no .txt) using your hosting File Manager. If you already see .htaccess, upload it as-is. See Step 5 for details.
Prepare your map tiles
Your map is the visual background visitors see when they open the app. It needs to be split into a grid of smaller image files called tiles. The default is a 3×3 grid (9 tiles), but you can use any grid from 1×1 up to 12×12.
Option A: Use the Map Tile & Bounds Tool (recommended)
Pick a map area and get the four GPS bounds the Guided Trail System needs, or split any image into a grid of named tiles ready for the /tiles folder.
How to do this
- Go to the tool: Map Tile & Bounds Tool.
- Follow the instructions onscreen.
- You can setup your Base Map 🖼 Tiles black Tiles out and obtain GSP bounds for a selected area.
- You can also split existing images into Tiles.
- The app will name the Tiles correctly and provide a .zip download.
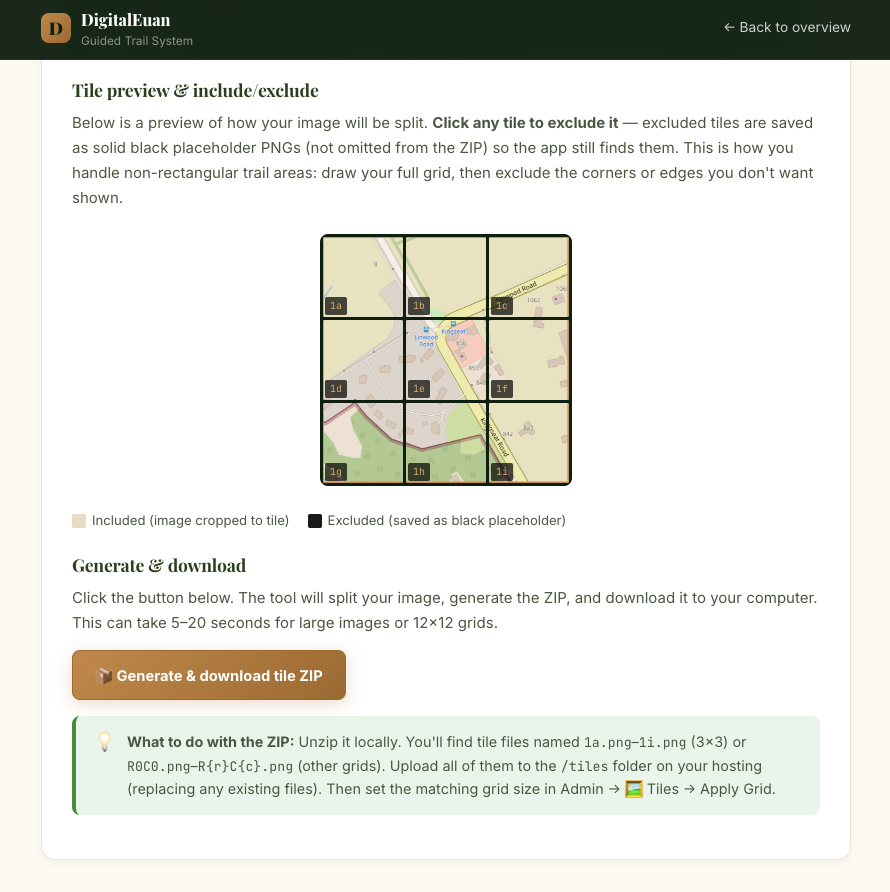
✨ Way easy.
Option B: Split the map image yourself
If you have an image editor (Photoshop, GIMP, or even a free online tool), split your map into a grid of equal-sized tiles before uploading. This gives you more control and lets you check each tile looks right.
For a 3×3 grid (9 tiles, named 1a–1i)
- Open your map image in your image editor.
- Divide it into 9 equal pieces: 3 rows × 3 columns.
- Save each piece as a separate PNG file using these exact names:
For larger grids (e.g. 4×4, 5×5, up to 12×12)
If your map is large or detailed, you can use a bigger grid. The naming convention changes:
- 3×3 uses
1athrough1i(legacy naming) - Anything else uses
R{row}C{col}naming — where R is the row number (0 = top) and C is the column number (0 = left) - Format: PNG (preferred for maps with text), JPG (smaller file size, fine for photos).
- Size: Each tile should be square. Recommended tile dimensions: 1000×1000 px to 2000×2000 px. Smaller = faster load but blurrier when zoomed.
- Total file size: Keep each tile under 500 KB if possible. Visitors on mobile data will thank you.
- Resolution: Don't use tiny images and expect them to look sharp when zoomed in. A 3×3 grid of 1500×1500 px tiles works well for most trails.
- Format: PNG (transparent background preferred)
- Dimensions: Around 400×100 px (4:1 aspect ratio works best — wide and short)
- File size: Under 100 KB
- Colour: The header background is dark green, so a light-coloured or white logo works best. If your logo is dark, you may want a "white" version for use here.
- In your unzipped folder, open the
images/folder. - You'll see a file called
logo.png(this is a placeholder). - Delete it (or rename it to
logo-old.pngjust in case). - Copy your logo into the folder and rename it to
logo.png(must be exactly this name). - Windows: Right-click
config.js→ "Open with" → Notepad (or better: download the free Notepad++). - Mac: Right-click
config.js→ "Open With" → TextEdit. Important: in TextEdit, go to Format menu and make sure "Make Plain Text" is selected before saving. 'Sculpture'/'Sculptures'— for art trails'Stop'/'Stops'— for heritage walks'Point of Interest'/'Points of Interest'— for general trails'Artwork'/'Artworks'— for galleries'Station'/'Stations'— for nature reserves- Log in to your hosting cPanel (usually at
yoursite.co.nz/cpanel). - Find the "Files" section and click File Manager.
- Navigate to your public_html folder (this is where your website lives). Sometimes it's called
wwworpublic_html. - Click + Folder (or "New Folder") at the top, and create a folder called
trail(lowercase). - Open the new
trailfolder by double-clicking it. - Click Upload at the top.
- Select ALL the files and folders from your unzipped
trail/folder on your computer and upload them. This includes:config.js,index.html,app.js,admin.js,style.css,manifest.json,save.php,README.md.htaccess(orhtaccess.txt— see the note below)- The
data/folder and its contents - The
tiles/folder with your tile images - The
images/folder with your logo - The
icons/folder - The
audio/folder (even if empty)
- Wait for all uploads to complete. This can take a few minutes if your map tiles are large.
- Rename
htaccess.txtto.htaccess(if your file came ashtaccess.txt): right-click the file → Rename → type.htaccess(with the dot, no.txt). If you can't see the file after uploading, click the Settings gear in cPanel File Manager and check "Show Hidden Files" — files starting with a dot are hidden by default. - Right-click the
datafolder → Change Permissions. - Set permissions to
775(tick: Owner Read/Write/Execute, Group Read/Write/Execute, World Read/Execute). - Click Save Changes.
- Create a
backupsfolder insidedata(right-click → New Folder → name itbackups). - Set the
backupsfolder permissions to775as well. - Only if you plan to run more than one map location (optional): create a
locationsfolder next todata(insidetrail/) and set its permissions to775too. This lets the admin portal create new map folders there automatically. Skip it if you're only ever going to have one map. - Download FileZilla (free) and install it.
- Open FileZilla and enter your hosting's FTP details:
- Host:
ftp.yoursite.co.nz(check with your host) - Username: your hosting username
- Password: your hosting password
- Port: 21 (or 22 for SFTP)
- Host:
- Click "Quickconnect".
- On the right side (Remote site), navigate to
public_html. - Right-click in the right pane → "Create directory" → name it
trail. - Double-click the new
trailfolder to open it. - On the left side (Local site), navigate to your unzipped
trail/folder on your computer. - Select ALL files and folders inside it, and drag them to the right side.
- Wait for the transfer to complete (watch the queue at the bottom).
- "404 Not Found" — the
index.htmlfile didn't make it up. Check thetrail/folder on your hosting via File Manager. - Directory listing appears — there's no
index.htmlin the folder. Re-upload it. - Page loads but looks broken (no styling) —
style.cssdidn't upload. Re-upload it. - Map area is grey — that's expected at this stage. We fix it in Step 7.
- North = latitude of the TOP edge of your map (the highest latitude, furthest north)
- South = latitude of the BOTTOM edge of your map (the lowest latitude, furthest south)
- East = longitude of the RIGHT edge of your map (the highest longitude, furthest east)
- West = longitude of the LEFT edge of your map (the lowest longitude, furthest west)
- Open Google Maps in your browser.
- Navigate to your trail area and zoom in until you can see the whole area your map covers.
- Right-click on the top-left corner of your map area (the north-west corner).
- A small menu appears — the first item shows coordinates like
-36.95780, 175.05340. Click it to copy. - Paste this somewhere safe. The first number is the latitude, the second is the longitude.
- Repeat for the other three corners:
- Top-right (north-east corner) → gives you North (latitude) and East (longitude)
- Bottom-left (south-west corner) → gives you South (latitude) and West (longitude)
- Bottom-right (south-east corner) → just a sanity check
- North = latitude from the top-left corner
- West = longitude from the top-left corner
- South = latitude from the bottom-right corner
- East = longitude from the bottom-right corner
- Latitudes are negative (we're in the southern hemisphere)
- Longitudes are positive (we're east of Greenwich)
- North is a smaller negative number than South (because -36.95 is "higher up" than -36.96)
- East is a larger number than West (because 175.06 is to the right of 175.05)
- Go to
https://yoursite.co.nz/trail/?mode=admin(note the?mode=adminat the end). - You'll see a password prompt. Enter the admin password you set in
config.jsin Step 4. - The Trail Map Creator interface loads. You'll see a blank map area on the left and a side panel on the right.
- In the toolbar at the top of the map, click ⊞ Map Bounds.
- A panel opens on the right with four input fields: North, South, East, West.
- Enter your four coordinates (just the numbers, no labels). For our Coromandel example:
- Click Apply Bounds.
- You should see the map area update — your tile images should now be visible as the map background. If they're not, check that your tile images were uploaded to the
tiles/folder. - If the map is shifted north: decrease the North value and increase the South value slightly (e.g. by 0.0001 — that's about 11 metres).
- If the map is shifted east: decrease the East value and increase the West value slightly.
- If the map looks stretched/squashed: the aspect ratio of your tile images doesn't match the aspect ratio of your bounds. You may need to re-split your map tiles with a different aspect ratio, or adjust your bounds to match the image.
- Open Settings (⚙ button in the admin header).
- Find the "GPS Fine-Tuning" section.
- Enter small metre values for Latitude and Longitude offsets. Positive = north/east, negative = south/west.
- Click Save & Download JSON, then upload the new
guidedtraildata.jsonto yourdata/folder. - Click on the map at the location of your first trail stop.
- The editor panel opens on the right, pre-filled with the GPS coordinates of where you clicked.
- Fill in the fields:
- Pin # — the number shown on the pin (1, 2, 3...). The app auto-suggests the next number.
- Item Title — e.g. "River Song"
- Artist Name — e.g. "Jane Smith" (optional)
- Year / Date — e.g. "2023" (optional)
- Description — a paragraph about this stop. What visitors will read when they tap the pin.
- More Information URL — a link to a website with more info (optional)
- Latitude / Longitude — already filled in. You can fine-tune if needed.
- Pin Layer — leave as "Main" for now (we cover layers below).
- Image Path — relative to your /trail folder, e.g.
images/river-song.png. We cover this in Step 11. - Audio Path — relative to your /trail folder, e.g.
audio/river-song.mp3. Optional. We cover this in Step 11.
- Click Save. The pin appears on the map.
- Repeat for each trail stop.
- Open Settings (⚙ button) → scroll to Pin Layers.
- Type a name for your new layer (e.g. "Seasonal") and click + Add Layer.
- When adding a pin, you can now select which layer it belongs to in the "Pin Layer" dropdown.
- Click the 🚻 WC button in the toolbar.
- Click on the map where the toilet is.
- A WC marker appears. Done — no editor opens for these.
- Click the 🗑 Bin button in the toolbar.
- Click on the map where the bin is.
- A bin marker appears.
- Move: Click and drag the marker to a new spot.
- Delete: Find the marker in the "WC & Bin Markers" list in the right panel, and click the red ✕ next to it.
- Click the 🛤 Trail Path button in the toolbar.
- A small control bar appears below the toolbar with "Finish Segment", "Cancel", and "Clear All Paths" buttons.
- Click on the map at the start of your path (usually near your first pin).
- Click again at the next waypoint along the trail. A dashed red line appears between the two clicks.
- Keep clicking to add more waypoints — follow the actual walking route.
- When you've reached the end of this segment, click ✓ Finish Segment.
- The path turns brown, indicating it's saved.
- Delete one segment: Find it in the "Trail Paths" list in the right panel and click the red ✕.
- Delete all paths: Click 🗑 Clear All Paths in the path controls. (This asks for confirmation.)
- In the Admin toolbar, click ▰ Zone.
- Click at least three points around the area on the map — for example a garden, lawn, paddock, keep-out area, farm road, concert platform, or market area.
- Click ✓ Finish. The polygon closes and the Zone editor opens.
- Enter a clear Name, choose a Colour, select the correct Layer, and add a description in Description / Notes.
- Click Save. Visitors can click the Zone on the public map to read its details.
- Select the Zone Note tool ✦ Zone Note.
- Click inside an existing Zone. The note editor opens with its coordinates filled in.
- Add a title and visitor-facing text. You can also add an image path, audio path, and information link.
- Click Save Note. The note appears in the Zone list and can be clicked or found through Search.
- Click ━ Line in the Admin toolbar.
- Click along the feature to add points. Use this for fences, water, power, underground or overhead services, tracks, boundaries, or a route visitors should stay behind or follow.
- Click ✓ Finish, then enter the Line name, colour, layer, description, optional image/audio paths, and information link.
- Click Save. Visitors can click the Line to read its note.
- Edit: Click a Zone, Line, or Zone Note on the Admin map, or select it from the right-hand list.
- Join: Use the ↔ button beside a Zone or Line to join it to another geometry of the same type. Review the resulting points after joining.
- Delete: Use the red ✕ button beside the geometry or its editor.
- Format: JPG or PNG
- Dimensions: Square (1:1) works best — e.g. 800×800 px
- File size: Under 200 KB per image
- Filename: Use lowercase, no spaces. E.g.
river-song.jpgnotRiver Song.JPG - Format: MP3 (best browser compatibility) or OGG
- Bitrate: 96–128 kbps is plenty for spoken audio
- Length: 30 seconds to 3 minutes per stop is typical
- File size: Under 5 MB per file
- Filename: Use lowercase, no spaces. E.g.
river-song.mp3 - Using File Manager (or FTP), upload your image files to the
images/folder insidetrail/. - Upload your audio files to the
audio/folder insidetrail/. - You can also upload images and audio files directly within the Admin panel without needing separate FTP/File Manager access.
- Back in the admin portal, click a pin, Zone, Line, or Zone Note to open its editor.
- In the Image Path field, enter the path relative to your
/trailfolder. For a file attrail/images/river-song.jpg, you enter:images/river-song.jpg - In the Audio Path field, enter:
audio/river-song.mp3 - Click Save.
- Repeat for each pin or map feature that needs media.
- Open your phone's browser (Safari on iPhone, Chrome on Android).
- Go to
https://yoursite.co.nz/trail/ - The map should load with your tiles and pins visible.
- Tap a pin — the info panel should slide up from the bottom.
- If the pin has audio, tap the audio button — it should play.
- Tap ▶ Start Tour — the tour bar should appear at the top.
- Tap ⊕ (Locate) — your phone should ask for location permission. Grant it. Your blue dot should appear on the map.
- If you have a compass: tap 🧭 — the map should rotate to match your facing direction.
- Tap 🗂 Layers — if you have multiple layers, you should see a toggle panel.
- Tap 🌙 Dark Mode — the whole app should switch to the dark palette instantly (pins and paths recolour, no page reload). Tap it again (now ☀ Light Mode) to switch back, then reload the page — your choice should be remembered.
- If you created a second map location (see Multiple locations & dark mode): tap 🗺 Switch Map and swap to the other location — the map, pins and audio should all change with it.
- On a desktop browser, also test ?mode=admin and make sure you can log in.
- In the admin header, click ☁ Save to Server.
- A confirmation dialog appears — read it and click OK.
- You'll see "✓ Saved to server — changes are now live".
- That's it! A backup of the previous data was automatically saved to
data/backups/on your server. - In the admin header, click 🚀 Publish.
- A ZIP file downloads to your computer. It contains:
data/guidedtraildata.json— all your trail data (pins, paths, bounds, settings)tiles/— any tile images you uploaded via the admin (if you did Option A in Step 3)PUBLISH_README.txt— quick instructions
- Open the ZIP and extract the
data/guidedtraildata.jsonfile. - Using File Manager (or FTP), upload this file to your
trail/data/folder, replacing the existing one. - If you have tile images in the ZIP's
tiles/folder, upload those totrail/tiles/too (replace existing). - Open
https://yoursite.co.nz/trail/?mode=admin - Log in with your admin password
- Make your changes (add a pin, edit a description, etc.)
- Click ☁ Save to Server — changes go live instantly
save.phpuploaded to yourtrail/folder (Step 5) with your admin password set (Step 4) — map folders are created on the server, not in your browser.- A writable
locations/folder insidetrail/with permissions775(see the optional item in Step 5's permissions instructions). If your wholetrail/folder is writable by the web server,save.phpcreates it automatically the first time you create a map. - Open the admin portal (
?mode=admin) and click 🗺 Maps in the header. - Type a name for the new location (e.g. "River Walk") and click + Create Map.
- The server creates a folder
trail/locations/river-walk/containing its owndata/,tiles/,images/andaudio/subfolders, plus a starter data file, and adds the location to the registry (data/locations.json). - The editor switches to the new map automatically — the badge next to "Trail Map Creator" in the admin header always shows which map you're editing.
- Build the new map exactly as you did your first one: set its ⊞ Map Bounds (Step 6), upload its 🖼 Tiles (Step 3), add pins, paths, Zones and media (Steps 7–11). Everything you do now targets that location only.
- Click ☁ Save to Server as usual — the data saves to
locations/river-walk/data/guidedtraildata.jsonwith its own automatic backups. - As soon as two or more locations exist, visitors see a 🗺 Switch Map button in the app menu. Tapping it lists every location; choosing one reloads the app with that location's map, pins, images and audio.
- Each visitor's last choice is remembered on their device for their next visit.
- You can link (or QR-code) straight to a location:
https://yoursite.co.nz/trail/?map=river-walk. - The main map (the one in your app root folder) always exists and cannot be deleted — you can only rename it.
- Visitors tap 🌙 Dark Mode in the app menu (inside the hamburger dropdown on phones). The entire app switches to a dark palette instantly — pins, trail paths, Zones and Lines recolour on the spot, with no page reload and no white flash on the next load.
- The choice is saved per device and restored on every visit. It's a visitor preference — it is not part of your published trail data and doesn't affect anyone else.
- To hide the button for a given location: open that map in the editor, go to ⚙ Settings → UI Toggles, untick Dark mode button, and save. Visitors who already switched to dark keep their palette — you're only choosing whether the button is offered.
- To recolour the dark palette for your brand, edit
themeDarkinconfig.js— for example: - Check that
index.htmlis uploaded to yourtrail/folder. - Check the URL — make sure it's
yoursite.co.nz/trail/with the trailing slash. - Check that the
trailfolder is insidepublic_html(or your host's equivalent). style.cssdidn't upload. Re-upload it to thetrail/folder.- You haven't set your map bounds yet. See Step 6.
- Your tile images aren't in the
tiles/folder. Check via File Manager. - Your tile images are named wrong. For 3×3:
1a.pngthrough1i.png(lowercase). For larger grids:R0C0.pngetc. - Make sure the URL has
?mode=adminat the end:yoursite.co.nz/trail/?mode=admin - Clear your browser cache and try again.
- First time on a new browser? You'll see a "First-time setup" prompt — enter the password you set in
save.php. The password is saved to that browser for future logins. - Forgot your password? Edit
$EXPECTED_PASSWORDinsave.phpon your server, then clear your browser's localStorage (or use a different browser) to re-trigger the first-time setup prompt. - "Server save is not configured" — your
config.jsis missing thesaveEndpoint: 'save.php'line, or you haven't uploaded the latestconfig.js. Hard-refresh (Ctrl+Shift+R) to make sure your browser has the new file. - "HTTP 500 — Data directory is not writable" — the
data/folder on your server needs write permissions. In cPanel File Manager, right-clickdata→ Change Permissions → set to775. Do the same fordata/backups/(create it if it doesn't exist). - "HTTP 401 — Authentication failed" — the password in your browser's localStorage doesn't match
$EXPECTED_PASSWORDinsave.php. Fix: editsave.phpto match your browser's password, OR clear your browser's localStorage (F12 → Application → Local Storage → Clear) and re-enter the password on next login. - "HTTP 404" —
save.phpisn't uploaded, or it's in the wrong folder. It should be in yourtrail/folder next toindex.html. - Your map bounds are slightly off. Re-measure the four corners in Google Maps and re-enter them.
- You can also drag pins to fine-tune their position.
- This is usually a device-level issue, not an app issue. Try standing next to a known pin and tapping it in the app — the Locate feature will re-align your blue dot.
- If the offset is consistent across all devices, set a GPS Offset in admin → Settings → GPS Fine-Tuning.
- This is browser policy — mobile browsers block audio from playing until the user has interacted with the page. The app handles this by "arming" audio on the first tap. Tap anywhere on the map first, then walk to a pin.
- If audio still won't play, check that the audio file path is correct (case-sensitive!) and that the file is in the
audio/folder. - Check the image path in the pin editor — it must be relative to
/trail, e.g.images/my-photo.jpg. - Check the file is uploaded and the filename matches exactly (case-sensitive).
- iOS 13+ requires permission. Tap the 🧭 button once and grant permission when prompted.
- If you denied permission earlier, go to iPhone Settings → Safari → Motion & Orientation Access and turn it on.
- You forgot to publish! Click ☁ Save to Server in the admin header (instant) — or 🚀 Publish and re-upload the
guidedtraildata.jsonfile. - If you used Save to Server, try hard-refreshing the public page (Ctrl+Shift+R) — your browser may have cached the old data.
- If you have multiple locations, check the badge in the admin header — you may have edited a different map than the one you're checking. Each location publishes separately.
- The
locations/folder doesn't exist or isn't writable. In cPanel File Manager, create alocationsfolder insidetrail/, right-click it → Change Permissions →775. - Creating, renaming and deleting maps needs
save.phpuploaded (Step 5) with the password matching your browser (Step 4) — the 🗺 Maps panel uses the same server endpoint as Save to Server. - It only appears when two or more locations exist — with a single map there's nothing to switch to.
- Check Admin → Settings → UI Toggles → Map switcher button for the map you're viewing (it's a per-location setting).
- Check
multiMap.enabledistrueinconfig.js. - Check Admin → Settings → UI Toggles → Dark mode button for the map you're viewing — like every menu button, it's controlled per location.
- If it's on, try a hard refresh (Ctrl+Shift+R) — an old cached data file can keep the old settings.
- Check the Troubleshooting section above — most common issues are covered there.
- Check the in-app
README.mdfile (in yourtrail/folder) for technical reference. - Try a hard refresh in your browser (Ctrl+Shift+R or Cmd+Shift+R) — sometimes old cached files cause issues.
- Your trail URL (e.g.
https://mytrail.co.nz/trail/) - The step number where you got stuck (e.g. "I'm on Step 6 — setting map bounds")
- A screenshot of what you're seeing
- Any error messages (from the browser console — press F12 to open it)
Free tools for splitting images
If you don't have Photoshop and don't want to use the Tool provided, there are free options online
A powerful, free online Photoshop alternative. Launch Tool →
Image specifications
Once you've prepared your tile images, drop them into the tiles/ folder (replacing any placeholder files that were in there). You'll upload the whole folder to your hosting in Step 5.
Add your logo
Your logo appears in two places: the top header of the public app, and the top of any PDF printouts you generate. It needs to be a PNG file, ideally with a transparent background.
Logo specifications
Replace the placeholder
The file must be named exactly logo.png (lowercase, .png extension). If it's called Logo.PNG or logo.jpg or my-logo.png, the app won't find it.
The app's config.js has a logoPath: 'images/logo.png' setting. You can name your logo differently (e.g. brand.png) - just edit the path in config.js.
Edit config.js
This is one of two code files you'll touch. config.js holds your branding, contact info, and a few settings. Open it in any text editor.
How to open it
Don't use Microsoft Word or any rich-text editor — they'll add hidden formatting that breaks the file. Use a plain text editor only.
What to change
When you open config.js, you'll see a block of settings. Edit only the values in quotes — don't change the property names (the words before the colons) and don't remove any commas or quotes.
const APP_CONFIG = {
  // ── Brand / Identity ──
  businessName:    'My Trail Trust',         // ← your organisation name
  businessUrl:     'https://mytrail.co.nz',  // ← your main website
  appTitle:        'My Trail Guide',         // ← shows in browser tab
  appDescription:  'My Trail Guide',         // ← shows in search results
  logoPath:        'images/logo.png',        // ← usually leave as-is

  // ── Data ──
  dataFileName:    'guidedtraildata.json',   // ← leave as-is

  // ── Multi-Map (Locations) ──
  multiMap: {
    enabled:      true,                   // ← leave as-is (false = single-map behaviour)
    registryFile: 'data/locations.json',  // ← leave as-is (must match save.php)
    defaultName:  'Main Map',             // ← name shown for your first map
  },

  // ── Dark Mode ──
  themeDark: null,   // ← null = built-in dark palette (or override colours — see Multiple locations & dark mode)

  // ── GPS ──
  triggerRadius:   10,         // metres — how close before audio plays
  gpsIntervalMs:   5000,       // ms — leave as-is

  // ── Labels ──
  itemLabelSingular: 'Sculpture',  // ← e.g. 'Artwork', 'Stop', 'Point of Interest'
  itemLabelPlural:   'Sculptures', // ← plural form

  // ── Admin ──
  adminPassKey:    'trail_admin_password',   // ← leave as-is
  defaultAdminPass: '',                      // ← LEAVE EMPTY (password is in save.php)

  // ── Direct-to-Server Save ──
  saveEndpoint: 'save.php',                  // ← leave as-is

  // ... (rest stays as-is)
};
Set your branding
Fill in your details
Edit businessName, businessUrl, appTitle, and the singular/plural labels for your trail type.
Common label pairs:
The admin password is NOT in any public files, the password is in save.php on your server. You'll set it in the next step.
Leave defaultAdminPass: '' as an empty string. Do not put a password here.
Save and close config.js
Once you've made those changes, save the file (File → Save) and close your text editor.
Now set your admin password in save.php
Open save.php in your text editor (same way you opened config.js). Near the top, you'll see this line:
$EXPECTED_PASSWORD = 'enter';Change 'enter' to a strong password of your choice. Use letters, numbers, and a symbol. For example:
$EXPECTED_PASSWORD = 'MyTrail2026!';Write this password down somewhere safe. You'll need it to log in to your admin portal and to use the "Save to Server" feature. Save the file and close your editor.
Why two files? config.js is loaded by the browser, so its contents are publicly visible. save.php runs on the server — its code is never sent to the browser. That's why the password lives in save.php and not in config.js.
Other settings you could change later: The triggerRadius (10 metres by default) controls how close a visitor needs to be to a pin before audio auto-plays. If your trail is in a noisy environment, you might want 15 or 20 metres. The antiCopy block controls right-click blocking etc. — leave it on unless you have a reason to turn it off. The multiMap block controls the multiple-locations feature (leave it alone for your first map), and themeDark customises the dark palette — both are covered in Multiple locations & dark mode below.
Upload to your hosting
Now you'll upload the entire trail/ folder to your web hosting so the world can reach it. There are two common ways to do this — pick the one that matches your hosting.
Option A: cPanel File Manager (most common)
Step-by-step
.htaccess file is important — don't skip it.
It blocks direct browser access to save.php (so visitors can't trigger saves) and protects your data/backups/ folder from being downloaded. If you skip it, the app still works, but your security is reduced.
Can't see .htaccess after uploading? In cPanel File Manager, click the Settings gear (top right) and tick "Show Hidden Files". Files starting with a dot are hidden by default.
Set folder permissions (important for Save to Server)
For the "☁ Save to Server" button to work, the data/ folder needs to be writable by the web server. After uploading:
In cPanel File Manager
Skip this step if you only want to use Publish (download ZIP). Folder permissions only matter for the "Save to Server" instant-publish feature. If you'd rather publish the old way (download a ZIP, upload the JSON file manually), you can skip the permissions step — but most people find Save to Server much more convenient.
File systems can vary between different hosting providers, this App works in just about anything but if you have trouble here contact us.
Option B: FTP (if you don't have cPanel)
Step-by-step
Upload the CONTENTS of the trail/ folder, not the folder itself. If you upload the folder, you'll end up with /public_html/trail/trail/index.html — double-nested. The URL should be yoursite.co.nz/trail/index.html, not yoursite.co.nz/trail/trail/index.html.
Verify the upload worked
Once everything's uploaded, open a browser and go to:
https://yoursite.co.nz/trail/You should see the app load — probably with a blank map (because you haven't set your GPS bounds yet). If you see a 404 error or a directory listing, something went wrong with the upload.
Common upload problems:
Set your map GPS bounds
This is the most important step. The app needs to know exactly where on Earth your map corresponds to, so it can place pins accurately and track visitors via GPS. If you haven't used the provided Map Tile & Bounds Tool you will need to get these details.
What are "map bounds"?
Your map image represents a real physical area. The "bounds" are the GPS coordinates of the four edges of that area:
How to find your GPS coordinates
(Use the provided Map Tile & Bounds Tool) alternatively you can use Google Maps:
You actually only need two corners: the top-left (NW) and bottom-right (SE). From those you get all four numbers:
Google Maps UI changes occasionally. As of writing, right-click shows coordinates at the top of the context menu. If Google changes this, the alternative is to click once to drop a pin, then read the coordinates from the search bar at the top.
Worked example — Coromandel Peninsula, NZ
Say your map covers a small bay. You right-click the top-left corner of your map area in Google Maps and get -36.95780, 175.05340. You right-click the bottom-right corner and get -36.96320, 175.06120.
Your four bounds are:
North (top lat):    -36.95780   ← from top-left, first number
South (bottom lat): -36.96320   ← from bottom-right, first number
East (right lng):   175.06120   ← from bottom-right, second number
West (left lng):    175.05340   ← from top-left, second number
Notice that for New Zealand:
Enter your bounds in the admin portal
Now you'll enter those four numbers into the app.
Open the admin portal
Enter the bounds
North (top lat):    -36.9578
South (bottom lat): -36.9632
East (right lng):    175.0612
West (left lng): 175.0534Fine-tuning the bounds
If your map looks slightly off — the tiles are visible but pins you place later seem to be in the wrong spot — you can fine-tune the bounds. Common adjustments:
GPS coordinates are precise. A difference of 0.0001 in latitude is about 11 metres on the ground. So if your map is off by 50 metres, you might need to adjust by 0.0005. Don't be afraid to experiment — you can always change the bounds later.
The GPS offset feature (if your pins are systematically off)
If you've placed pins using the admin map and they look right on screen, but visitors using GPS find their blue dot is consistently offset from where they actually are, that's a GPS offset issue. You can fix this in Settings → GPS Fine-Tuning:
This is rare — only use it if multiple visitors report the same offset.
Add your marked items (pins)
Now that your map is in place, you can start adding your trail stops. Each pin represents one marked item — a sculpture, a historical point, an information sign, etc.
Make sure you're in "Marked Item" mode
At the top of the admin map, the first button in the toolbar should be highlighted: Marked Item. If it's not, click it.
Add a pin by clicking the map
Moving a pin
If a pin isn't quite in the right spot, you can drag it. Click and hold the pin, drag it to the correct location, and release. The new coordinates are saved automatically.
Editing a pin later
Click on any existing pin to re-open its editor. Make your changes and click Save.
About pin layers (optional)
If your trail has multiple sections (e.g. "Main Trail" and "Seasonal Extension"), you can use layers to organise pins, Zones, Lines, and paths. Visitors can toggle layers on and off, and Search only lists features on visible layers.
If you only have one trail, ignore this — the default "Main" layer is fine.
Add utility markers (WC / bins)
Besides your main trail stops, you can mark toilets (WC) and rubbish bins on the map. These show as small icons and help visitors plan their visit.
Add a toilet marker
Add a rubbish bin marker
Moving or deleting utility markers
Utility markers are optional. Only add them if they're genuinely useful for your visitors — don't feel you have to map every bin on the trail.
Draw trail paths
Trail paths are the dashed lines that show visitors the walking route between pins. They're optional but recommended — they make the tour mode much more useful.
Draw a path segment
Multiple segments
If your trail branches or has multiple sections, draw each as a separate segment. Just start a new path after finishing the previous one.
Deleting paths
Paths and tour mode: When a visitor uses "Start Tour" mode, the app draws a highlighted path between the current and next pin. If you've pre-drawn trail paths, the tour follows those. If not, it draws a straight line — which can look odd. Drawing paths is worth the effort.
Draw Zones & Lines
Zones and Lines let you map more than individual trail stops. Use a Zone for an area and a Line for a route, boundary, fence, service run, or other linear feature. Both can be assigned to layers and appear in the public map and Search when that layer is visible.
Create a Zone
Add Zone Notes
Zone Notes mark specific spots inside a Zone. They are useful for gates, crossings, entrances, hazards, viewpoints, service points, or other local information.
Create a Line
Edit, join, or delete geometry
Layer tip: Put related features on the same layer — for example “Farm Operations”, “Event Layout”, or “Main Trail”. Visitors can then show or hide that group using the Layers button, and Search will follow the same visibility setting.
Add images & audio
Each marked item can have a photo and an audio guide. When visitors tap a pin (or walk within 10 metres of it), the photo and audio play automatically.
Image specifications
Audio specifications
Consider use an AI Assisted voice generator for a regular tone throughout your tour.
Upload your media
Link media to pins, Zones, Lines, and Zone Notes
The paths are case-sensitive and must match exactly. If your file is called River-Song.JPG but you enter images/river-song.jpg in the path field, the image won't load. Check capitalisation and file extension.
Test on your phone
Before going live, test the app on your phone.
Test checklist
If something doesn't work
See the Troubleshooting section below for common issues and fixes.
Publish & go live
Everything you've done in the admin portal so far has been saved to your browser's local storage — only you can see it. To make it visible to visitors, you need to publish. There are two ways:
Option A: Save to Server (recommended — instant)
This is the fastest way to publish. It writes your changes directly to the server — no downloading and re-uploading files.
This is the recommended workflow for ongoing edits. Every time you make a change (add a pin, edit a description, etc.), just click ☁ Save to Server and it's live instantly. No file downloading or uploading required.
Option B: Publish (download ZIP — for first setup or tile changes)
Use this option if you've uploaded new tile images through the admin portal (those need to go in the ZIP), or if you haven't set up save.php / folder permissions.
You must publish (or save to server) for visitors to see your changes. Until you do, your admin edits live only in your browser. If you make edits later, use either option again.
Already created extra locations? Each location publishes separately. When a location other than your main map is open in the editor, the Publish ZIP nests everything under locations/<map>/ — unzip it into your trail/ folder and everything lands in the right place. See Multiple locations & dark mode below.
You're live!
Congratulations — your trail is now live at https://yoursite.co.nz/trail/. Share this URL on your signage, website, social media, and printed materials.
Optional: Add to Home Screen
Visitors on iPhone or Android can "Add to Home Screen" from their browser menu. The app will appear as an icon on their home screen, opening full-screen like a native app. No setup required from you — this works automatically.
Going forward
To make updates later:
That's it. Your trail is live and maintainable.
Multiple locations & dark mode
Two features arrive with version 4.4.0, both optional. Multiple locations lets one installation of the app serve several different maps — a town trail and a farm walk, or three reserves across a region — with every location keeping its own tiles, images, audio and data, while sharing the one core system. Dark mode gives your visitors a 🌙 button that switches the whole app to a dark palette. You can ignore both features completely and everything on this page works exactly as described.
Multiple locations: what you need first
Create a new map location
How visitors switch between locations
Rename vs delete: Renaming a location only changes its display name — the folder and any printed ?map= links keep working. Deleting a location asks for confirmation, then removes its entire folder (data, tiles, images, audio and backups) from the server. There is no undo, so download anything you want to keep first.
Each location is edited and published separately. Switching locations in the admin portal loads that map's own working copy — changes to one location never appear on another until you switch to it and edit it there. The two new Settings toggles ("Map switcher button" and "Dark mode button") are also per location.
Dark mode: how it works
// config.js — customise the dark palette (null = built-in defaults)
themeDark: {
  paper:    '#171b12',   // page background
  cream:    '#242a1f',   // panel background
  textDark: '#ece9df',   // primary text
  gold:     '#c0894a',   // highlights / buttons
},Only ever going to have one map? Leave everything as it is — the 🗺 Switch Map button never appears with a single location, and you can switch the whole multi-map feature off in config.js with multiMap: { enabled: false } if you prefer. No locations are deleted by doing so.
Troubleshooting
Common issues and their fixes. If your problem isn't here, see Getting help below.
The page won't load (404 error)
The page loads but looks broken (no styling)
The map area is grey / blank
The admin portal won't open
"Save to Server" shows an error
Pins I placed are in the wrong spot
GPS blue dot is in the wrong place
Audio won't autoplay
Images don't show on pins
Compass mode doesn't work on iPhone
Changes I made in admin aren't visible to visitors
Creating a map fails / "Could not create locations/…"
The 🗺 Switch Map button isn't showing
The 🌙 Dark Mode button isn't showing
Getting help
If you get stuck, we're here to help. Tier 1 includes email support for setup questions.
Before you contact us
When you contact us, please include
Contact
📧 Email: info@digitaleuan.com
🌐 Website: digitaleuan.com
⏱ Response time: Within 1 NZ business day (usually faster)
We do our best to work through any issues as fast as possible.
Want to upgrade? If you find setup is taking longer than expected, you can upgrade to Tier 2 at any time — we'll take over the setup for you, using the work you've already done. Just email us and we'll quote the difference.